Remote OpenClaw Blog
How to Set Up AI Assistants in Under 10 Minutes
7 min read ·
Most people assume setting up an AI assistant requires days of configuration, custom code, and a background in machine learning. It does not. With a pre-configured OpenClaw persona and the right API keys, you can have a fully functional AI assistant running in under 10 minutes — handling email triage, Slack messages, and daily briefings on your behalf.
This guide walks through every step, from purchasing your persona to activating an assistant that sorted 93% of incoming emails (145 out of 156)[5] in its first week of production use, with prices starting at $3 for the first month and $6/month for the Lite plan[6].
Prerequisites
Before you start the 10-minute clock, gather these items:
- Access to Remote OpenClaw — visit the marketplace to choose your persona. You will need an account to download files after purchase.
- Gmail OAuth 2.0 credentials — follow Google Cloud Console to create an OAuth 2.0 client ID. You need the
client_id,client_secret, andrefresh_token. OpenClaw personas integrate Google Workspace natively[4]. - Slack Bot Token (optional) — if you want your assistant on Slack, create a Slack App at api.slack.com and grab the
xoxb-bot token with the scopes your workflows need.
With those credentials ready, the actual setup takes four steps.
Step 1: Purchase and Download Your Persona
Each persona in the marketplace is a production-tested bundle that includes a SOUL.md identity file, pre-configured skills, a memory system, daily schedule, and a setup checklist. Here are the options:
| Persona | Price | Best For |
|---|---|---|
| Compass — Life Assistant | See pricing | Personal scheduling, reminders, daily triage |
| Atlas — AI Chief of Staff | See pricing | Email drafting, CRM updates, multi-step operations |
| Scout — Sales Agent | See pricing | Lead scoring, outreach sequences, pipeline management |
| Muse — Content Creator | See pricing | Blog drafts, social posts, content repurposing |
| Complete Suite | See pricing | All 4 personas bundled |
After purchasing from the OpenClaw Launch marketplace or the ClawHub community store, you receive a ZIP file containing everything needed for the next step. Download it and keep it accessible.
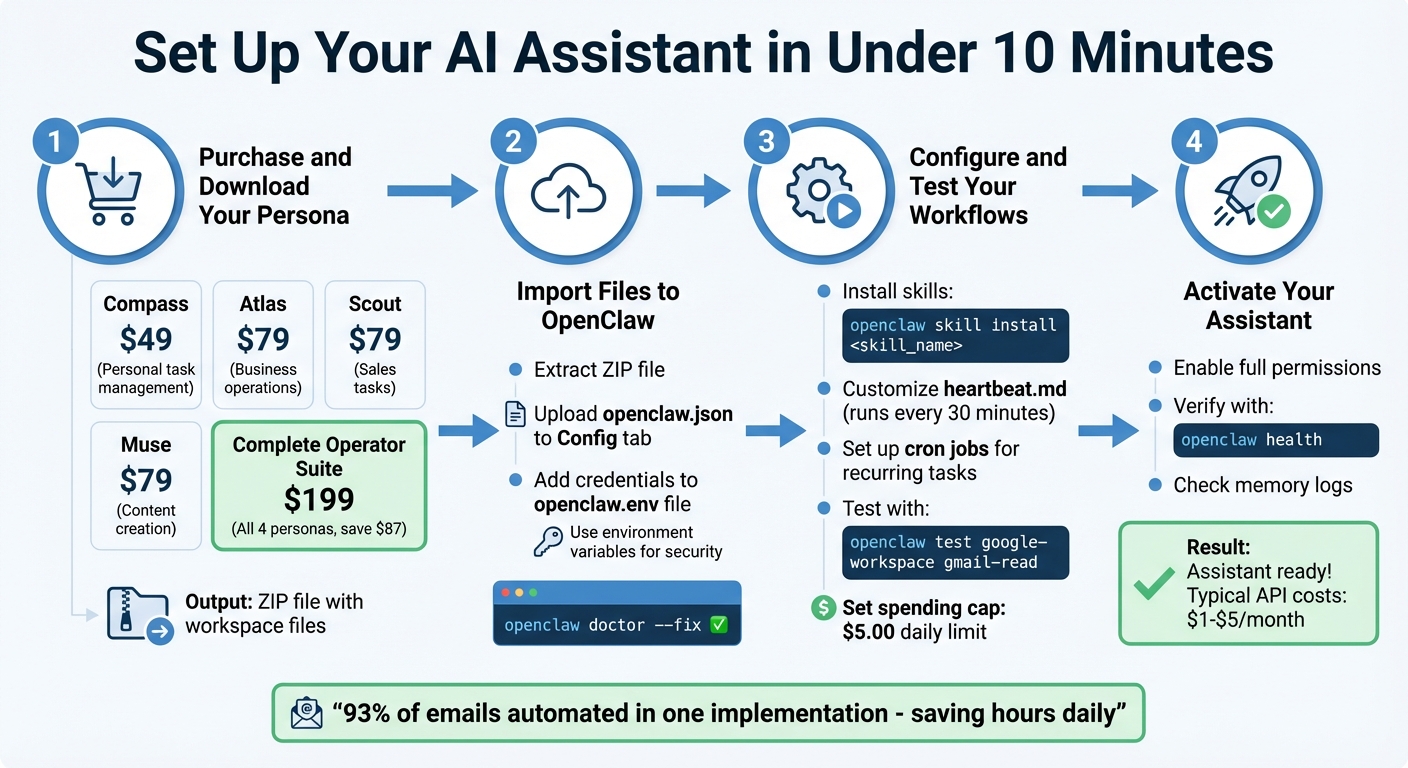
Step 2: Import Files to OpenClaw
Extract the ZIP file and upload the configuration to your OpenClaw instance. Here is the process:
1. Extract the persona archive:
unzip compass-persona.zip -d ~/openclaw/personas/compass2. Upload the main config file:
openclaw import ~/openclaw/personas/compass/openclaw.json3. Set your credentials as environment variables (never hardcode secrets in config files):
export GMAIL_CLIENT_ID="your-client-id-here"
export GMAIL_CLIENT_SECRET="your-client-secret-here"
export GMAIL_REFRESH_TOKEN="your-refresh-token-here"
export SLACK_BOT_TOKEN="xoxb-your-token-here"
4. Validate the configuration:
openclaw doctor --fixThe doctor --fix command checks your config for missing fields, verifies API credentials, and auto-corrects common issues like incorrect file paths or deprecated settings. If everything passes, you will see a green checkmark for each validation step.
Step 3: Configure and Test Workflows
With the base config imported, install the skills your persona needs and customize the schedule.
Install skills from the marketplace:
openclaw skill install daily-briefing
openclaw skill install cost-optimizer
openclaw skill install security-hardener
Over 5,400 community-created skills[4] are available. Browse them at the marketplace — 7 are completely free.
Customize your heartbeat schedule:
The heartbeat.md file controls when your assistant runs scheduled tasks — summarizing daily priorities, logging activities and preferences accurately[2][7]. Edit it to match your working hours:
openclaw edit heartbeat.mdA typical heartbeat includes a Morning Brief at 8:00 AM[4], email triage every 30 minutes during business hours, and an end-of-day summary at 6:00 PM.
Set up cron jobs for background execution:
Schedule your Morning Brief to run at 8:00 AM using a cron job[4]:
openclaw cron add --schedule "*/30 8-18 * * 1-5" --task "email-triage"
openclaw cron add --schedule "0 8 * * 1-5" --task "morning-briefing"
Test your configuration end to end:
openclaw testThe test command sends a simulated message through each connected channel (Gmail, Slack) and verifies that API access is functioning properly[5]. It does not send real emails or messages — it runs in sandbox mode. For initial setup, start with read-only permissions[5] until you are confident in the configuration.
Best Next Step
Use the marketplace filters to choose the right OpenClaw bundle, persona, or skill for the job you want to automate.
Set spend caps to control API costs:
openclaw config set monthly_spend_cap 10.00
openclaw config set model_routing auto
With model routing set to auto, simple tasks use cheaper models while complex tasks route to Claude or GPT-4. OpenClaw supports over 200 AI models[4] through OpenRouter. Set a daily spending limit[4] to stay in control. Most single-user setups run at $1 to $5 per month[6] in API costs.
Step 4: Activate Your Assistant
With testing complete, enable full permissions and bring your assistant online:
Enable full permissions:
openclaw permissions enable --scope productionVerify system health:
openclaw healthThe health check confirms that all channels are connected, credentials are valid, skills are loaded, and cron jobs are scheduled. A passing health check looks like this:
$ openclaw health
[OK] Gmail — connected (OAuth 2.0)
[OK] Slack — connected (bot token)
[OK] Skills — 3 loaded (daily-briefing, cost-optimizer, security-hardener)
[OK] Cron — 2 jobs scheduled
[OK] Memory — persistent storage active
[OK] Spend cap — $10.00/month
Status: All systems operational
Your assistant is now live. It will begin handling incoming messages, running scheduled tasks, and logging activities and preferences accurately[2] from every interaction.
In production, operators report that their assistant can automate 93% of incoming business emails[5] — drafting replies, categorizing messages, flagging items that need human attention, and archiving noise.
Tips to Speed Up Setup
If you want to shave even more time off the process, here are the shortcuts experienced operators use:
- Start with the Complete Suite . Bundling from the start saves $88 and gives you all four personas. You can activate one now and spin up the others as your needs grow.
- Install multiple skills in a single command:
openclaw skill install daily-briefing cost-optimizer security-hardener - Use the 7 free skills first. The Daily Briefing, Cost Optimizer, and Security Hardener skills cost nothing and cover the most common use cases.
- Set spending caps before activating. A $10/month cap is more than enough for most single-user setups and prevents any surprises while you learn the system.
- Simplify billing with OAuth[2]. Using OAuth tokens instead of API keys simplifies credential management and makes rotation easier.
- Add Telegram delivery. The Telegram bot integration takes only 3 minutes to set up through @BotFather[1][3] and gives you mobile access to your assistant from anywhere.
- Use
openclaw doctor --fixliberally. Run it after every config change — it catches issues faster than debugging logs manually.
Wrapping Up
The entire process — from downloading your persona to running openclaw health and confirming a live assistant — takes under 30 minutes[2] even on your first attempt. Experienced operators do it in under 10.
"That's 10 minutes to a personal AI assistant. No PhD required." — OpenClawAI
Once activated, your data stays private[1] — OpenClaw runs locally on your machine, and API calls go directly to model providers without passing through third-party servers.[1]
Frequently Asked Questions
Which persona should I start with?
The Personal Assistant persona via WhatsApp is the easiest entry point. Compass covers daily scheduling, reminders, and message triage out of the box. Once you are comfortable, upgrade to Atlas for full chief-of-staff capabilities including email drafting, CRM updates, and multi-step workflows.
How do I keep Gmail from sending emails automatically?
Check your Gmail filters and any third-party tools connected to your account. Inside OpenClaw, use the send_requires_approval setting in your persona config to ensure every outgoing email waits for your explicit approval before sending. This gives you full control while still letting the assistant draft and prepare messages.
openclaw config set send_requires_approval trueWhat is the easiest way to avoid unexpected API costs?
Use the built-in usage controls. Set a monthly spend cap, enable model routing to use cheaper models for simple tasks, configure context caps to limit token usage per conversation, and take advantage of free tiers from providers like Google Gemini for low-priority tasks.
openclaw config set monthly_spend_cap 10.00
openclaw config set model_routing auto
openclaw config set context_cap 4096
Related Guides
- The Complete Guide to OpenClaw — the full reference covering setup, security, memory, and operations
- OpenClaw Beginner Setup Guide — detailed walkthrough from zero to a running agent
- Reducing OpenClaw Token Costs (Up to 90% Cheaper) — advanced cost optimization strategies
- OpenClaw Skills: The Complete Guide — building and deploying custom agent skills
- OpenClaw 3-Tier Security Hardening — production security before going live